Using Conditional Formatting
Explanation
Conditional Formatting is very useful when you want to highlight certain information
in an IFS Applications table/overview page. For example, you might want to highlight credit
invoices, or you might want to highlight supplier invoices exceeding a certain amount
or inventory parts where available quantity is below a certain number. You
can set up different types of conditions to control text style, text and background
color and to combine several formatting rules for one column/page. Your conditional
formatting rules are personal and stored in your user profile.

Figure 1: Example of Conditional Formatting rule where orders with gross
amount over 100 000 and Coordinator ALAIN are highlighted
Prerequisites
N/A
System Effects
N/A
Window
N/A
Related Window Descriptions
N/A
Procedure
Using Conditional Formatting
- Open an IFS Applications table/overview page. Right-click on the column
header of the column you want to create conditional formatting for and
choose Conditional Formatting from the context menu.
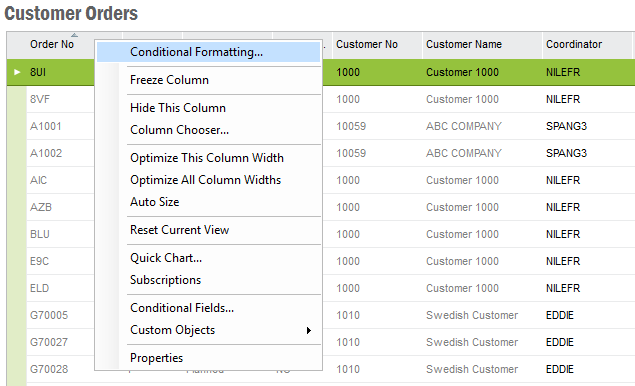
Figure 2: How to open the Conditional Formatting dialog box
- The Conditional Formatting dialog
box is displayed. Click New Condition button to start creating a rule. You can
also press Alt + N to do the same. It is possible to create several rules
for one column.
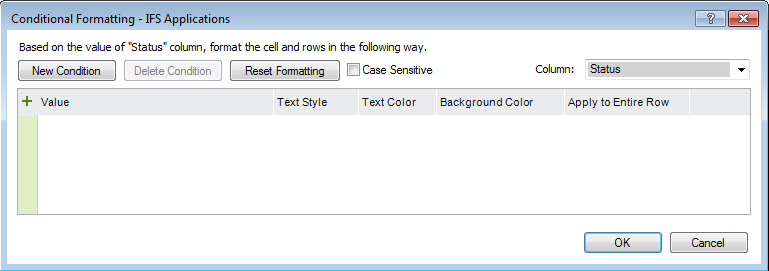
Figure 3: Dialog box for Conditional Formatting
- For each rule you specify Value, Text Style, Text Color,
Background Color, see below:
- Value. This is where you specify the condition for the rule. Use
the same syntax as in the Search dialog. Read more about
Using Search.
- Text Style. In the drop-down list you can select Regular, Bold or
Italic.
- Text Color. In the drop-down list you can select from a list of
colors.
- Background Color. In the drop-down list you can select from a
list of colors.
- Apply to Entire Row. Check the check box if you want the rule to
apply to the complete row, Uncheck if you only want the cells to be
highlighted.
- Once you have specified all rules click OK button to save your
changes and the rules will be applied on the page.
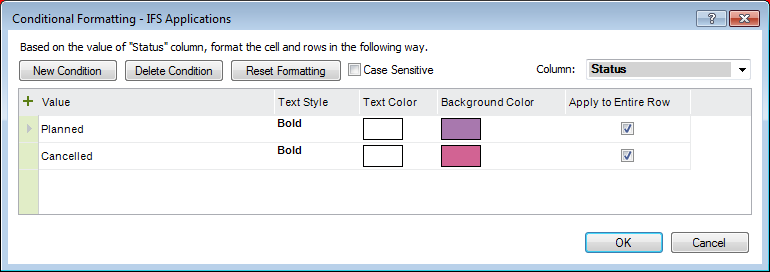
Figure 4: Dialog box for Conditional Formatting
with example
The Conditional Formatting dialog contains the following buttons/options:
- New Condition: Click this to start creating a rule. You can also press
Alt + N to do the same.
- Delete Condition: Click this to delete a rule. You can also press
Alt+ D to do the same. (This option is enabled if a rule exists only)
- Reset Formatting: Click this (or use shortcut key Alt + R)
to remove all formatting rules for the page. A dialog box is displayed asking
for you to confirm the removal of formatting rules.
- Case Sensitive: Select this check box if the rules for a specific
column need to be case sensitive. The default value for this is not case sensitive.
Note: This setting applies per column.
- Column: Indicates the column the formatting rule applies to.
When you open the dialog it will default to the column where you had the
cursor placed but you can choose from any of the columns in the drop-down
list. The columns that have rules created are highlighted with bold font.
Modify a Conditional Formatting
- Right-click on the column header and choose Conditional Formatting
from the context menu.
- The Conditional Formatting dialog
box is displayed. All columns are available in the Column list. Select
the column you want to change, columns with an existing rule are
highlighted with bold font. The formatting rule is displayed and you
can make changes, add new formatting rules to the column or delete formatting
rules.
- To remove all formatting rules for the page, click Reset Formatting
or use shortcut key Alt + R. A dialog box is displayed asking for
you to confirm the removal of formatting rules.
- If you want to delete a rule, click Delete Condition. You can
also press Alt + D to do the same. (This option is enabled if a rule
exists only)
- Click OK button to save your changes